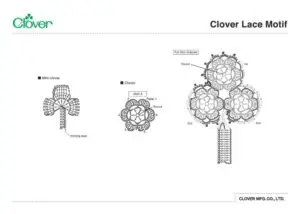
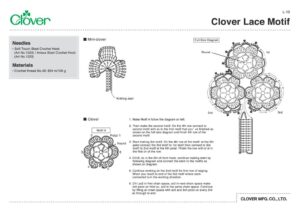
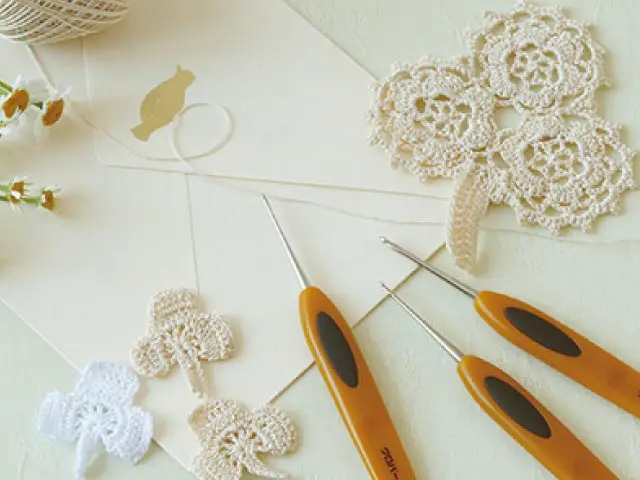
Customize Consent Preferences

We use cookies to help you navigate efficiently and perform certain functions. You will find detailed information about all cookies under each consent category below.

The cookies that are categorized as "Necessary" are stored on your browser as they are essential for enabling the basic functionalities of the site. ... 

Always Active

Necessary cookies are required to enable the basic features of this site, such as providing secure log-in or adjusting your consent preferences. These cookies do not store any personally identifiable data.

No cookies to display.

Functional cookies help perform certain functionalities like sharing the content of the website on social media platforms, collecting feedback, and other third-party features.

No cookies to display.

Analytical cookies are used to understand how visitors interact with the website. These cookies help provide information on metrics such as the number of visitors, bounce rate, traffic source, etc.

No cookies to display.

Performance cookies are used to understand and analyze the key performance indexes of the website which helps in delivering a better user experience for the visitors.

No cookies to display.

Advertisement cookies are used to provide visitors with customized advertisements based on the pages you visited previously and to analyze the effectiveness of the ad campaigns.

No cookies to display.

back To Top
ภาษา

Clover Lace Motif

Materials

• Crochet thread No.40: 824 m/100 g


เทมเพลต

Clover Lace Motif_template_enのサムネイル
icon

ไฟล์รายการ (pdf)

L_10_Clover Lace Motifのサムネイル
icon

วิธีทำ

1

Make Motif A follow the diagram.

2

Then make the second motif. On the 4th row connect to second motif with sc to the first motif that you' ve finished as shown on the full size diagram and finish 4th row of the second motif.

3

Start making 3rd motif. On the 4th row of 3rd motif: at the 5th petal connect the 3rd motif to 1 st motif then connect to 3rd motif to 2nd motif at the 6th petal. Finish the row with sl st in the first eh of the row.

4

Ch18, de in the 5th eh from hook, continue making stem by following diagram and connect the stem to the motifs as shown on diagram.

5

Continue working on the 2nd motif for first row of edging. When you reach to end of the 3rd motif where stem connected turn the working direction.

6

Ch1 ,sc2 in first chain space, sc3 in next chain space make 3ch picot on third sc, sc2 in the same chain space. Continue by filling all chain space with sc5 and 3ch picot on every 3rd sc through to end.