
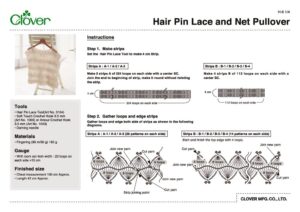
Hair Pin Lace and Net Pullover

Готовый размер
• Chest measurement 100 cm Approx. • Length 42 cm Approx.
Инструменты
Materials
• Fingering (95 m/30 g) 160 g
Gauge
• With loom set 4cm width : 22 loops on each side =10 cm
Изготовление
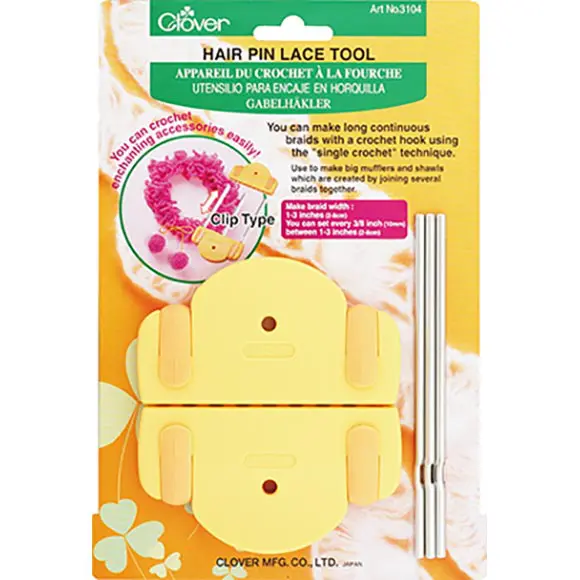
Step 1. Make strips
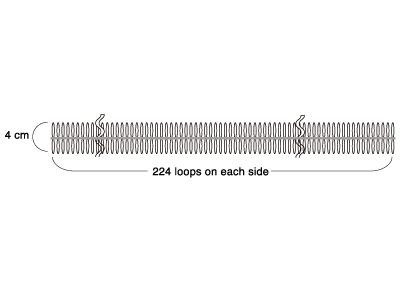
Set the Hair Pin Lace Tool to make 4 cm Strip.
Strips A: A-1 / A-2/ A-3
Make 3 strips A of 224 loops on each side with a center SC.
Join the end to beginning of strip, make it round without twisting the strip.
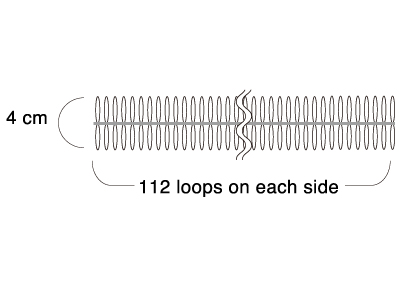
Strips B : B-1 / B-2/ B-3 / B-4
Make 4 strips B of 112 loops on each side with a center SC.
Step 2. Gather loops and edge strips
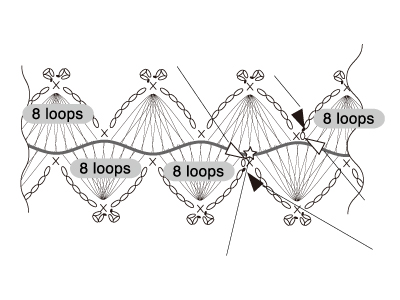
Gather loops and edge both side of strips as shown in the following diagrams.
Strips A : A-1 / A-2 / A-3 (28 patterns on each side)
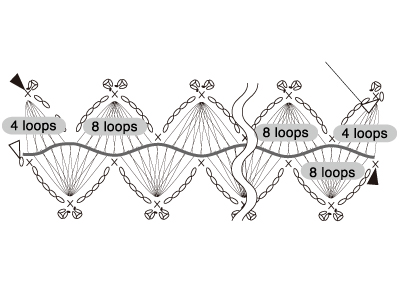
Strips B : B-1 / B-2 / B-3 / B-4 (14 patterns on each side)
Start and finish the top edge with 4 loops.
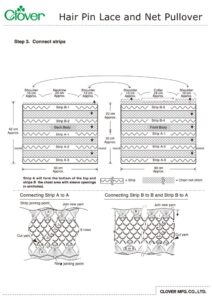
Step 3. Connect strips
Connect the bottom edging of B-1 to the top edging of B-2 with netting work as shown on diagrams on page 2-3.
Repeat the instruction1 for B-3 to B-4 and connecting with netting work. Follow the diagrams on page 2-3.
Connect 1st half of A-1 with B-2 and 2nd half of A-1 with B-4 by the following the instructions and tips on page 2-3. Pay attention to locating the strip joining point when attaching to B-2, B-4 and A-1 All strips A joining have to be locted under right arm in same direction.
Connect A-1 to A-2 with netting work as shown on diagrams on page 2-3.
Connect A-2 to A-3 with netting work as shown on diagrams on page 2-3
Crochet net stitch for top part of B-1. Do not cut yarn and leave enough for connecting the strip B-1 to B-3 for right shoulder. (See on the diagram)
Crochet net stitch for top part of B-3, do not cut the yarn, continue working , connect to B-1 for left shoulder and edge the neckline. Cut the yarn and weave in. (See on the diagram)
Connect B-3 to B1 with the yarn already joined for right shoulder as shown on diagram at page 4.
Step 4. Edging
Edge the left-armhole as shown on diagram at page 4, cut the yarn and weave in. Repeat the instruction 10 for right-armhole. Cut the yarn and weave in.
Enjoy wearing your pullover!